Fiber Optic Tools For Installers
Download a list of tools for installation here. (PDF, 100kB)
The
frequency of problems caused by fiber optic tools is high: their poor
design, improper use, poor condition or the unfamiliarity with their
use all are sources of problems during installation.
Installation
tools include some big hardware like bucket trucks, trenchers, cable
pullers or plows. The need for these will be established early in the
planning stages. Many contractors do not own expensive equipment like
this, finding it more cost effective to rent it as needed. If your
crews are not familiar with a particular piece of equipment, subbing
the work to someone who has both the equipment and an experienced crew
may be much more cost effective, as mistakes in their operation can be
disastrous – both costly and dangerous.
Outside plant cables and
premises singlemode cables will generally require fusion splicing for
concatenation of long cable runs and splicing on pigtails for
termination. Since fusion splicers have become less costly, more
contractors have purchased them. Other contractors who have fewer
projects that require splicing prefer to rent them, knowing they are
getting a splicer that is a newer model with the latest technology that
has been recently serviced. The downside of a rental unit is your
installers may not be familiar with that model and require some
training or time to familiarize themselves with it. If you own your
splicer, it’s assumed your crews are familiar with its operation and
need only to inspect the unit to ensure it’s working properly and the
arc electrodes are in good condition.
Most contractors own
termination equipment for multimode fiber as it is used on most jobs.
Generally contractors have a preferred method of termination, either
adhesive/polish or prepolished/splice types. Either type requires
dedicated toolkits. For epoxy or Hot Melt terminations, the appropriate
curing ovens will be required, and the two are quite different; the Hot
Melt oven is much hotter and will ruin epoxy connectors if used on them
by mistake. If you use epoxy or anaerobic adhesives from your stock,
check the expiration dates on all of them to make sure they are fresh.
Also check for other consumables like wipes, isopropyl alcohol, cable
gel cleaner and of course, connectors.
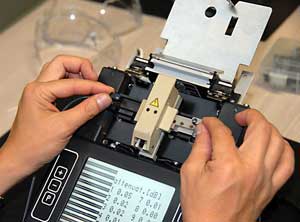
Prepolished splice connectors
have been getting better and easier to use. Newer termination kits
include a quality cleaver like those used with fusion splicers and a
visual fault locator to verify the internal splice. Since newer kits
can now produce connectors that have lower losses, around 0.5 dB, a new
kit (and perhaps some training) and the latest connectors could be a
good investment.
When checking out the termination kits, pay
particular attention to the condition of the tools. Of course missing
tools will need replacement, but hopefully that was done when the kits
were inspected after the last job. However, jacket strippers, fiber
strippers and cleavers can wear out or be damaged, so its important to
check their operation with some sample fibers to see if they are
working properly.
Let me repeat that thought: It’s mandatory to
check out every piece of equipment you intend to take to a job site to
ensure its proper operation and let the installation crew reacquaint
themselves with its operation. This process needs to be done with
enough time to have the unit serviced or replaced and restock any
consumable supplies. It should also be obvious that one never puts back
on the shelf any equipment that has had problems in the field. It
should immediately be replaced or sent out for repair to be ready for
the next job or discarded.
Let me caution you on another problem we
have seen recently with tools. Several recent complaints of poor
quality tools, especially fiber strippers, have led us to believe that
poor quality imports are becoming more common. In one case, the tools
appear to have been counterfeit, branded with a well-known American
name. I suggest you purchase tools only from reputable sources and
inspect them on receipt to ensure they work properly.
Finally, as
the equipment is checked out and readied for use, make certain that
appropriate safety equipment is packed with the tools. Everyone who
works with fiber needs safety glasses and clean, unscratched ones will
make seeing those hair-thin fibers much easier. Black work mats for
splicing and termination also help the installer see the fibers and
find fiber scraps for easier cleanup.
Fiber Optic Tool Kits
The
fiber optic installer needs a complete set of fiber optic tools and
test equipment, plus supplies used in pulling cables, splicing and
terminating them, then testing and troubleshooting the installation.
This is a fairly comprehensive list of these items, but no such list
could be complete and some specific components may require special
tools that are recommended by the component manufacturer.
Typical Fiber Optic Toolbox Contents:
Test Equipment - Choose test equipment compatible with the fiber types being tested and wavelengths of use
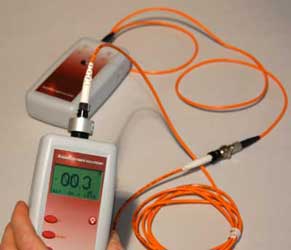
Fiber optic power meter
Fiber optic test source
Connector adapters for power meter (ST, SC, LC)
Connector inspection microscope (may be in termination kit)
Visual tracer & continuity checker (MM only) or Visual Fault Locator (MM + SM)
Optional: OTDR with launch and receive cables (generally outside plant)
Optional: Fiber identifier (generally outside plant)
Testing Supplies and Consumables - Choose tcomponents compatible with the fiber types and connectors to be tested
Reference fiber optic patch cords
Mating adapters for connectors
Alcohol pads or isopropyl alcohol (99%+) and lint free wipes
Cable Handling Tools
Utility knife
Cable cutter or hacksaw for larger cables
Tubing cutter for cable armor
Buffer tube cutter
Cable slitter
Needle nose pliers for pullcords (ripcords)
Pulling eyes
Electrical tape
Termination/Splicing Tools
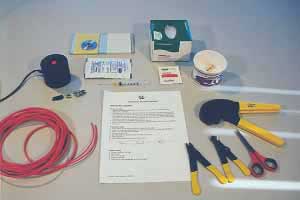
Cable jacket stripper
Stripper for fiber buffer (Miller, No-Nik or Micro-strip)
Connector crimper
Fiber scriber or cleaver
Scissors for aramid (Kevlar) strength members
Tweezers for picking up fiber scraps or pulling fiber shards out of skin
Polishing puck for connector (ST, SC or LC)
Polishing plate (glass or plastic)
Polishing pad for PC connectors (rubber)
Optional: Connector epoxy curing oven (for epoxy/polish connectors) or HotMelt Oven (for 3M HotMelt connectors)
Optional: Fusion splicer and appropriate strippers and cleavers
Black work mats (helps one see the fibers, both during termination or splicing and when cleaning up)
Carrying Case(s) with lock
Note:
Some processes require common hand tools such as screwdrivers, pliers,
socket sets, wrenches, and even saws. Most workers will have a full set
of hand tools.
Consumables List (depends on components used)
Termination
Connectors
Epoxy, syringes, needles (for epoxy/polish connectors)
Anaerobic adhesive (for anaerobic/polish connectors)
Trash bins (1 pint disposable delicatessen cups work well)
Polishing films (usually 12, 3, 0.3 micron)
Lint-free wipes
Isopropyl alcohol (lab grade, 99%)
Splicing
Splices (mechanical splices)
Splice protectors (fusion spices)
Splice trays and closures
Trash bins (1 pint disposable delicatessen cups work well)
Lint-free wipes
Isopropyl alcohol (lab grade, 99%)
You can download a list of tools for installation here. (PDF, 100kB)
More Topics On Fiber Optic Installation
Table of Contents: The FOA Reference Guide To Fiber Optics
|